^ a is your
Attack Cost
when you first scout the base. When you destroy the base, you receive the normal
Gold
reward plus your
Attack Cost
at the time you scouted the base. Like all islands, the
Resource
reward will not increase after the base has been scouted.
Boss bases drop fixed numbers of
Power Stone
s when destroyed, and you have additional chances to get more
Power Stone
s from the usual chance which is explained on our
Power Stone
page.
| style="width: 50%; padding: 10px;" valign="top" |
Total Number of Buildings:
表达式错误:无法识别标点符号“{”。
Total Energy Available from Buildings:
表达式错误:无法识别标点符号“{”。
Destroying a building will reduce the HQ's health by:
表达式错误:无法识别标点符号“{”。
%
| colspan="2" |
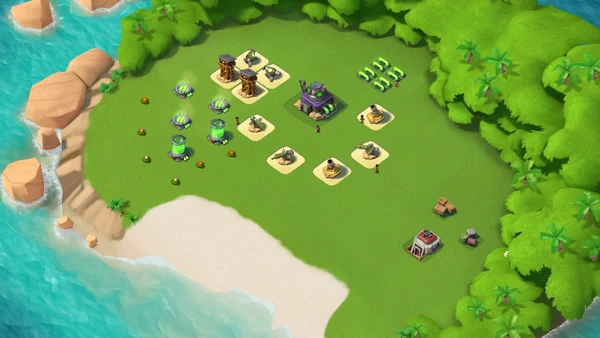
Strategy
Recommended Army Composition:
2+
Heavies
and 16+
Riflemen
Walkthrough:
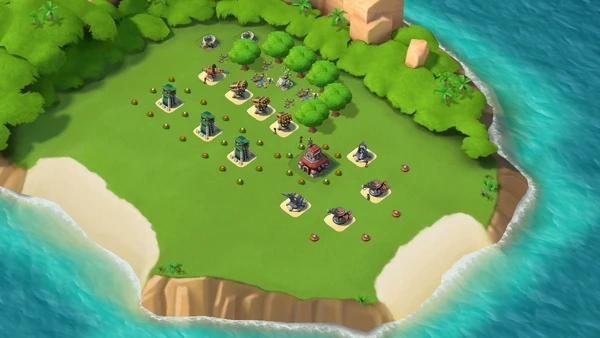
Stay to the right & clear out the
Machine Gun
s and
Mortar
s while supporting your troops with
Medkit
s. It will be helpful to use one
Artillery
to destroy the 4 Dream Pipes and gain lots of Gunboat Energy as well as damage the HQ.
{{#var:alternate1}}
{{#var:alternate2}}
{{#var:alternate3}}
{{#vardefine:buildingnum|105}}{{#vardefine:alternate1||-
| colspan="2" |
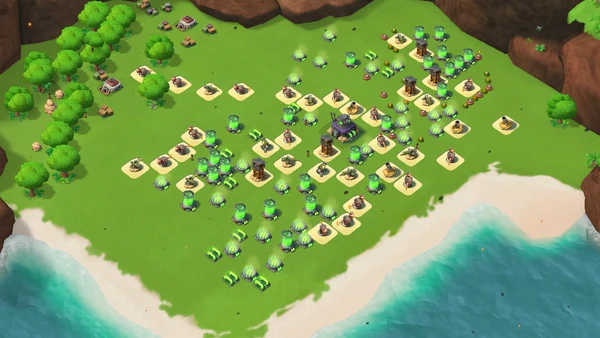
Alternate Strategy
Recommended Army Composition:
15+
Warrior
s
Walkthrough:
Destroy the 4 adjacent Crystal Solutions with
Artillery
. Dock your troops on the side with no defenses, let them destroy few Ominous Hatches, Crystal Solutions etc. and then
Flare
them next to the Headquartes. Use
Medkit
s and
Shock Bomb
s as a support.}}{{#vardefine:alternate2|}}{{#vardefine:alternate3|}}{| id="Hammerman_HQ_2" class="wikitable mw-collapsible mw-collapsed" data-expandtext="Show" data-collapsetext="Hide" style="border-width: 6px; border-style: ridge; border-color: red; width: 100%;"
| colspan="2" |
Hammerman's HQ 2 (XP Level 20)
| colspan="2" |
| style="width: 50%; padding: 10px;" valign="top" |
Total Number of Buildings:
表达式错误:无法识别标点符号“{”。
Total Energy Available from Buildings:
表达式错误:无法识别标点符号“{”。
Destroying a building will reduce the HQ's health by:
表达式错误:无法识别标点符号“{”。
%
| colspan="2" |
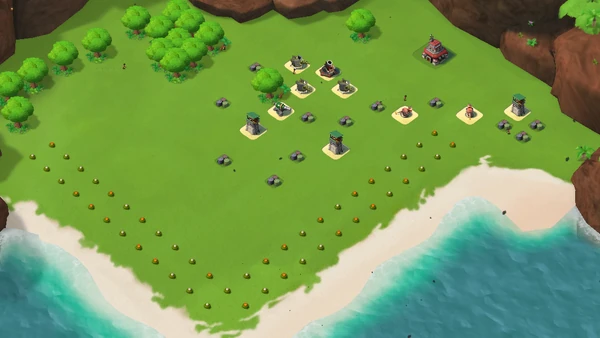
Strategy
Recommended Army Composition:
4+
Heavies
& 12+
Zooka
s
Walkthrough:
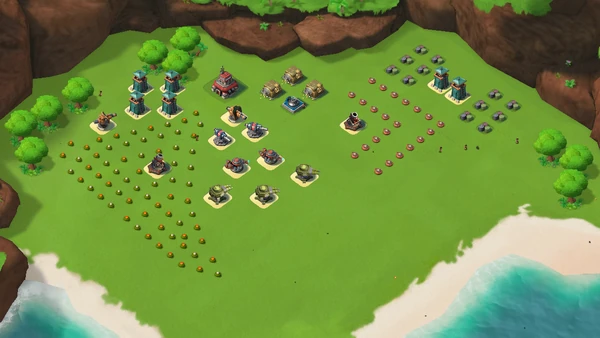
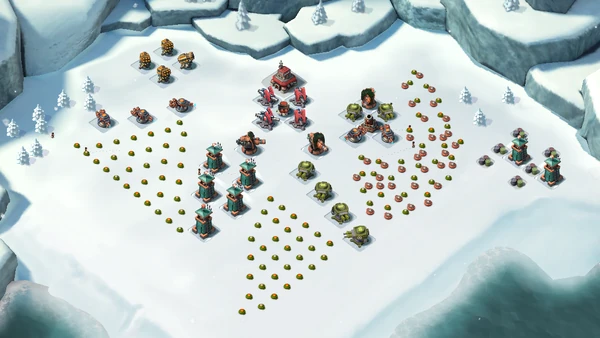
Dock your troops to where the 3
Flamethrower
s touch the solution cylinders and take out the 2 left-most
Cannon
s. Make sure your troops are getting GBE from the Non-Defensive Buildings to the lower right hand side. Let them steamroll the defenses while supporting them with
Medkit
s and
Shock Bomb
s.
{{#var:alternate1}}
{{#var:alternate2}}
{{#var:alternate3}}
{{#vardefine:buildingnum|22}}{{#vardefine:alternate1||-
| colspan="2" |
Alternate Strategy
Recommended Army Composition:
15+
Warrior
s
Walkthrough:
Deploy your
Warrior
s on the left side of the beach.
Flare
them to the leftmost corner of the base to avoid most of the
Mine
s. Use
Medkit
s to heal up your
Warrior
s if necessary. Then
Flare
them to the
Super Mortar
. Its projectiles shouldn't be able to hit your
Warrior
s due to their very slow speed. Once your
Warrior
s are close to the
Super Mortar
, place a
Shock Bomb
in between the
Super Mortar
and the
Machine Gun
s. Let your
Warrior
s destroy the
Super Mortar
. As soon as that's done,
Flare
your
Warrior
s to the
Headquarters
and let them take it down.}}{{#vardefine:alternate2||-
| colspan="2" |
Second Alternate Strategy
Recommended Army Composition:
Around 3-4
Critter Cannons
and a number of support troops if necessary.
Walkthrough:
Deploy the Critter Cannons on the right side of beach, then allow they to fire upon the nearby structures. Once the immediate threats are down, fire a
Flare
to the
Headquarters
. If the
Super Mortar 3000
targets the Critter Cannons, shock bomb it until it begins to target the
Critters
instead. Since Critter Cannons shoot faster than the Super Mortar, it's unlikely that the Super Mortar can destroy all of the Critters quickly, meaning that it will keep targeting the critters, but the base would be obliterated anyways.}}{{#vardefine:alternate3|}}{| id="Hammerman_HQ_3" class="wikitable mw-collapsible mw-collapsed" data-expandtext="Show" data-collapsetext="Hide" style="border-width: 6px; border-style: ridge; border-color: red; width: 100%;"
| colspan="2" |
Hammerman's HQ 3 (XP Level 25)
| colspan="2" |
| style="width: 50%; padding: 10px;" valign="top" |
Total Number of Buildings:
表达式错误:无法识别标点符号“{”。
Total Energy Available from Buildings:
表达式错误:无法识别标点符号“{”。
Destroying a building will reduce the HQ's health by:
表达式错误:无法识别标点符号“{”。
%
| colspan="2" |
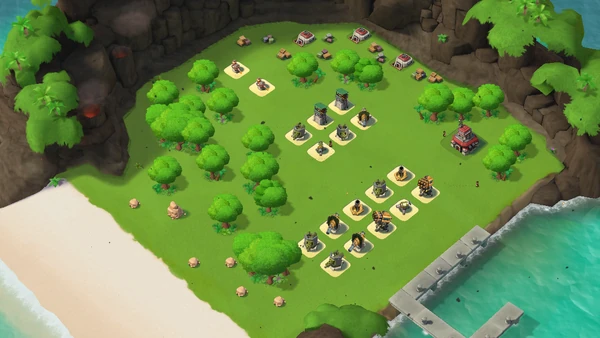
Strategy
Recommended Army Composition:
15+
Warrior
s
Walkthrough:
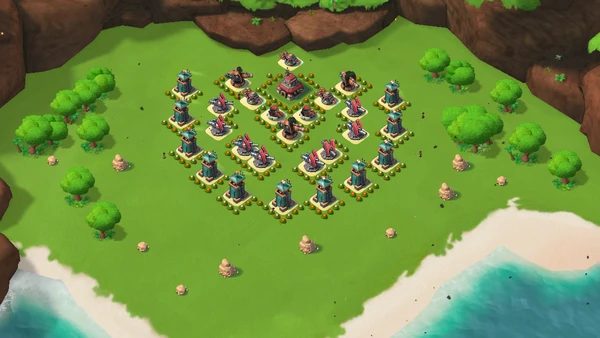
Deploy your
Warrior
s on the right side of the beach. Take out the
Sniper Tower
, then take down as many
Supplies
as you can before receiving fire from the
Flamethrower
s. Put a
Medkit
near the back of both
Flamethrower
s and
Flare
your
Warrior
s to the
HQ
. They should run through the flames while getting healed by the
Medkit
.
Shock Bomb
the
Super Mortar
as many times as possible to prevent it from demolishing your
Warrior
s as they take down the
HQ
.
{{#var:alternate1}}
{{#var:alternate2}}
{{#var:alternate3}}
{{#vardefine:buildingnum|28}}{{#vardefine:alternate1||-
| colspan="2" |
Alternate Strategy
Recommended Army Composition:
Heavies
and
Zooka
s
Walkthrough:
Destroy both
Rocket Launcher
s with
Barrage
and
Artillery
then dock your troops to the right & let them steamroll the right while supporting them with
Medkit
s and
Shock Bomb
s. Once all the right hand side buildings are destroyed, drop a
Flare
to the right side of the
Headquarters
and let your troops finish the HQ.}}{{#vardefine:alternate2|}}{{#vardefine:alternate3|}}{| id="Hammerman_HQ_4" class="wikitable mw-collapsible mw-collapsed" data-expandtext="Show" data-collapsetext="Hide" style="border-width: 6px; border-style: ridge; border-color: red; width: 100%;"
| colspan="2" |
Hammerman's HQ 4 (XP Level 30)
| colspan="2" |
| style="width: 50%; padding: 10px;" valign="top" |
Total Number of Buildings:
表达式错误:无法识别标点符号“{”。
Total Energy Available from Buildings:
表达式错误:无法识别标点符号“{”。
Destroying a building will reduce the HQ's health by:
表达式错误:无法识别标点符号“{”。
%
| colspan="2" |
Strategy
Recommended Army Composition:
15+
Warrior
s
Walkthrough:
Use
Gunboat Weaponry
to destroy the two
Flamethrower
s. Deploy your
Warrior
s on the left side of the beach and
Flare
them to the leftmost
Supplies
. Let your
Warrior
s destroy the
Supplies
and
Supplies
until they come under fire from the
Rocket Launcher
s. At that point,
Flare
your
Warrior
s to the
HQ
and
Shock
the
Rocket Launcher
s and wait for your
Warrior
s to destroy the
HQ
.
{{#var:alternate1}}
{{#var:alternate2}}
{{#var:alternate3}}
| style="width: 50%; padding: 10px;" valign="top" |
Total Number of Buildings:
表达式错误:无法识别标点符号“{”。
Total Energy Available from Buildings:
表达式错误:无法识别标点符号“{”。
Destroying a building will reduce the HQ's health by:
表达式错误:无法识别标点符号“{”。
%
| colspan="2" |
Strategy
Recommended Army Composition:
10+
Tank
s
Walkthrough:
Use
Gunboat Weaponry
to destroy the right
Cannon
and the
Boom Mine
next to it. Deploy your
Tank
s on the right edge of the right beach.
Flare
them beside where the
Cannon
was. Then,
Flare
the
Headquarters
making sure you are out of range of everything but the
Rocket Launcher
s. You may want to
Medkit
the
Tank
s or
Shock Bomb
the
Rocket Launcher
s as they fire on your
Tank
s while they are destroying the
Headquarters
.
{{#var:alternate1}}
{{#var:alternate2}}
{{#var:alternate3}}
{{#vardefine:buildingnum|33}}{{#vardefine:alternate1||-
| colspan="2" |
Alternate Strategy
Recommended Army Composition:
At least 3-4
Critter Cannons
, as well as
Medics
. Also bring
Dr. Kavan
with
Ice Shields
.
Walkthrough:
Deploy everything on the right side of beach. If you know that you can run out of energy quickly, consider clearing some
Boom Mines
with
Barrage
/
Artillery
. The Critters can distract the Super Mortar and Sniper Towers, make sure the
Super Mortar
doesn't hit the Critter Cannons, if necessary use Ice Shields to negate the hit or freeze it with anything you can use. Once the Sniper Towers are destroyed, the Critters may target the Super Mortar and can clear a few mines. With the pileup the Super Mortar goes down quickly. After that, target headquarters. It's recommended to check the range of Boom Cannons during a scout so they can hit only the critters. Now once they swarm the HQ, sit back and witness Hammerman's obliteration.}}{{#vardefine:alternate2|}}{{#vardefine:alternate3|}}{| id="Hammerman_HQ_6" class="wikitable mw-collapsible mw-collapsed" data-expandtext="Show" data-collapsetext="Hide" style="border-width: 6px; border-style: ridge; border-color: red; width: 100%;"
| colspan="2" |
Hammerman's HQ 6 (XP Level 40)
| colspan="2" |
| style="width: 50%; padding: 10px;" valign="top" |
Total Number of Buildings:
表达式错误:无法识别标点符号“{”。
Total Energy Available from Buildings:
表达式错误:无法识别标点符号“{”。
Destroying a building will reduce the HQ's health by:
表达式错误:无法识别标点符号“{”。
%
| colspan="2" |
Strategy
Recommended Army Composition:
30+ level 6+
Warrior
s
Walkthrough:
First,
Barrage
the top
Boom Mine
s. Then deploy all your
Warrior
s on the right side of the beach. Let them run to the right side of the base.
Shock
the the right
Super Mortar
when it turns towards your
Warrior
s. Wait for your
Warrior
s to destroy the
Sniper Tower
s and
Supplies
. Then
Flare
your
Warrior
s to the
HQ
.
Shock
the
Cannon
s and the right
Super Mortar
and wait for your
Warrior
s to take down the
HQ
.
{{#var:alternate1}}
{{#var:alternate2}}
{{#var:alternate3}}
| style="width: 50%; padding: 10px;" valign="top" |
Total Number of Buildings:
表达式错误:无法识别标点符号“{”。
Total Energy Available from Buildings:
表达式错误:无法识别标点符号“{”。
Destroying a building will reduce the HQ's health by:
表达式错误:无法识别标点符号“{”。
%
| colspan="2" |
Strategy
Recommended Army Composition:
Heavy
-
Zooka
Walkthrough:
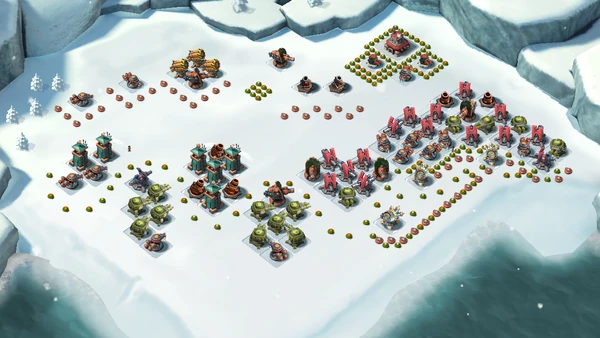
If possible, destroy the
Doom Cannon
. Regardless, deploy your troops on the left side of the beach. Destroy the first few rows of buildings, then
Flare
into the corner near the
Cannon
s. Use
Shock Bomb
s and
Smoke Screen
s (if available). As your troops approach the
Rocket Launcher
, use a Shock Bomb to stop it, the Shock Blaster, and the nearby
Boom Cannon
s. They should be destroyed quickly. Then, attack the
HQ
from the top side, being sure to avoid the
Lazor Beam
(it is recommended to check its range during a scout).
{{#var:alternate1}}
{{#var:alternate2}}
{{#var:alternate3}}
| style="width: 50%; padding: 10px;" valign="top" |
Total Number of Buildings:
表达式错误:无法识别标点符号“{”。
Total Energy Available from Buildings:
表达式错误:无法识别标点符号“{”。
Destroying a building will reduce the HQ's health by:
表达式错误:无法识别标点符号“{”。
%
| colspan="2" |
Strategy
Recommended Army Composition:
35+ level 10+
Warrior
s
Walkthrough:
Barrage
the middle of the
Headquarters
and the top
Boom Cannon
on one side of the base. Deploy your
Warrior
s on that side of the beach and use
Flare
s to get your
Warrior
s to run to the top corner. Then,
Flare
your
Warrior
s to the
Headquarters
and use a few
Smoke Screen
s to get on it. As the
Smoke Screen
covering your
Warrior
s on the
Headquarters
wears off,
Shock
as many nearby
Defenses
as possible, and destroy the
Headquarters
.
{{#var:alternate1}}
{{#var:alternate2}}
{{#var:alternate3}}
| style="width: 50%; padding: 10px;" valign="top" |
Total Number of Buildings:
表达式错误:无法识别标点符号“{”。
Total Energy Available from Buildings:
表达式错误:无法识别标点符号“{”。
Destroying a building will reduce the HQ's health by:
表达式错误:无法识别标点符号“{”。
%
| colspan="2" |
Strategy
Recommended Army Composition:
42+ level 12+
Warrior
s
Walkthrough:
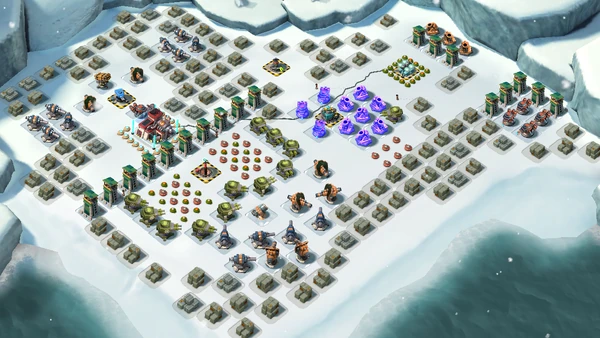
Deploy all of your
Warrior
s and
Flare
them to the
Machine Gun
. Use
Smoke Screen
s to hide your
Warrior
s from the
Machine Gun
. Then
Flare
your
Warrior
s to the
Headquarters
and make a path of
Smoke Screen
s to the
HQ
. Use a
Medkit
if required. When the
Smoke Screen
on the
HQ
dissipates, use a
Shock Bomb
on the
Super Mortar
and
MMG
as many times as possible while your
Warrior
s take down the
Headquarters
.
{{#var:alternate1}}
{{#var:alternate2}}
{{#var:alternate3}}
| style="width: 50%; padding: 10px;" valign="top" |
Total Number of Buildings:
表达式错误:无法识别标点符号“{”。
Total Energy Available from Buildings:
表达式错误:无法识别标点符号“{”。
Destroying a building will reduce the HQ's health by:
表达式错误:无法识别标点符号“{”。
%
| colspan="2" |
Strategy
Recommended Army Composition:
56+ level 14+
Warrior
s, 90+ Initial
Gunboat Energy
Walkthrough:
Use two
Barrage
s to clear the
Mine
s and
Boom Mine
s on the right end of the beach. Use a few
Artillery
to trigger the
Mine
s on the right side of the W design near the
MMGs
. Then, pre-
Smoke
the beach,
Flare
the far right
Machine Gun
, and deploy all your
Warrior
s on the right end of the beach. When your
Warrior
s reach the
Machine Gun
,
Flare
them to the
Headquarters
and cover them with
Smoke Screen
s as they run to it. As the
Smoke Screen
covering the
Warrior
s on the
Headquarters
dissipates,
Shock Bomb
the
Super Mortar
s and
MMGs
. Your
Warrior
s will take down the
Headquarters
easily. Congratulations! You have beaten Lt. Hammerman!
{{#var:alternate1}}
{{#var:alternate2}}
{{#var:alternate3}}
Hammerman Strikes back is an
Event
in which Lt. Hammerman attacks you. Defend your base from his attacks and you will be rewarded. Learn more on the
Hammerman Strikes Back
page.
The Imitation Game is an Event in which Lt. Hammerman has copied the best player bases in the Archipelago! Defeat his bases to earn rewards. Learn more on the
Imitation Game
page.
Quotes
"I am Lieutenant Hammerman of the Blackguard. These islands belong to us now. We'll crush your puny base!"
- Before Hammerman's first attack on the player's base
"So you beat back my scouts... next time, I won't make it a fair fight!"
- After Hammerman's first (failed) attack on the player's base
"I'm Lt. Hammerman and I'm taking over this village! Soon, you too will be my slave! MUAHAHAHAH!"
- When the Blackguard invades a
Freed Village
for the first time
"Grab all Power Stones! Drop everything else and let's get out of here!"
- When the player defeats a
Blackguard Base
for the first time
"Behold, the Super Mortar 3000! It will shred your troops to ribbons! Mwahahahahaha!"
- When the player discovers Hammerman's level 25 HQ
"No! That's unfair, you used some kind of trick to destroy my Super Mortar 3000! I won't let it fall into your dirty rebel hands. Men, burn the wreckage and the blueprints!"
- After the player destroys Hammerman's level 25 HQ
"Now you'll see what happens when you mess with the Blackguard. Prepare yourself!"
-When the player discovers Hammerman's level 30 HQ
"You idiot! You're trampling the ruins of your ally's base! Yes, I took this base from the famous General Zhao. Next time, I'll pay you a visit!"
- After the player destroys Hammerman's level 30 HQ
"This holy island had lots of statues for us to smash, and native shamans to drive into the sea!"
- When the player discovers Hammerman's level 35 HQ
"So you're angry now? Good! I sacrificed one base to win the psychological battle! Next time we meet, I'll have another surprise waiting for you..."
- After the player destroys Hammerman's level 35 HQ
"Yes, IT'S BACK! We have Super Mortar 3000 production back online at twice the rate!"
- When the player discovers Hammerman's level 40 HQ
"No! How can it be! I planned this base perfectly, and now it's a burning ruin! At least with all the mines we planted, nobody's going to be safe on that island again!"
- After the player destroys Hammerman's level 40 HQ
"Say hello to two of my best friends. I've decided to call them both Massacre Machine Gun 9000."
- When the player discovers Hammerman's level 50 HQ
"My ears are still ringing! How did your troops not run away from that terrifying sound? Give my respect to your troops, and let them know they won't survive the next encounter!"
- After the player destroys Hamerman's level 50 HQ
"Together, my two superweapons make a nasty combo! Get ready for some pain!"
- When the player discovers Hammerman's level 55 HQ.
"This is impossible! I've pored over every handbook and manual on defensive strategy... and you still beat me! I have no option but to use strength in numbers to CRUSH you!"
- After the player destroys Hammerman's level 55 HQ
"I will accept your surrender now. A Quadra Combo of superweapons cannot be beat!"
- When the player discovers Hammerman's level 60 HQ.
"Time to change tactics. I'm done building bases, from now on I'm going full offense! My fleet will hunt you down and crush your puny base!"
- After the player destroys Hammerman's level 60 HQ
"It's payback time! Tell me where your puny base is, and I'll crush it!"
- When Lt. Hammerman appears on the Archipelago in the
Hammerman Strikes Back
event
"Enough light probing. Time for a full frontal assault!"
- When you defeat the 2nd stage of
Hammerman Strikes Back
"I could swear your base was right here... show your face and I'll smash it!"
-
When you defeat the 4th stage of
Hammerman Strikes Back
"I've copied the most formidable mercenary bases of the Archipelago! You'll never defeat them!"
- When Lt. Hammerman appears on the Archipelago in the
Imitation Game
event
"Hmph. The next base will make you beg for mercy!"
- When you defeat the 2nd stage of
Imitation Game
"You may have taken down a few, but this is far from over. You'll be defeated soon enough!"
- When you defeat the 4th stage of
Imitation Game
"I admire your tenacity, but this is as far as you get. Witness the ultimate base!"
- When you defeat the 6th stage of
Imitation Game
"Curses! I will find even stronger bases next week!"
- When you defeat the 7th stage of
Imitation Game
Trivia
It seems Lt. Hammerman is obsessed with
Statue
s and
Power Stone
s because of their mystical powers.
However, the only
Statue
he ever uses on one of his bases is a
Life
Statue
on his level 35 base.
This might be since he seems to be more interested in smashing the statues to get the Power Stones in them (as seen in his quote when his level 35 base is discovered)
Lt. Hammerman's bases drop 5
Victory Points
when destroyed. The amount never changes.
Un-discovered Hammerman bases are covered in clouds. Tapping will say, 'Suspicious activity reported in this region!'
After you defeat one of his bases, various freed villages around your
Archipelago
will put on a fireworks show. Normally when you reclaim a village, only the village that you freed will shoot fireworks.
It seems that Lt. Hammerman is in need of a promotion, considering that he appears to be the lower ranked one of the two Blackguard officers in the game (lower than
Colonel Gearheart
;
Dr. T
doesn't appear to carry a military rank). He does, however, refer to the High Command that he will have to report to after the player destroys his level 60 base.
Despite being a higher level, Lt. Hammerman's Levels 55 and 60 bases give less loot than his Level 50 one.
Although the quote after the player destroys his level 60 base is referring to the
Hammerman Strikes Back
event, almost all players have already played the
Hammerman Strikes Back
event (available at
HQ
level 15) before destroying his level 60 base (available at
HQ
level 20).
Although Lt. Hammerman's
Headquarters
appears to have machine gun slits, they do not ever attack troops.
There's an
achievement
which is called Payback that gives a total of 175 diamonds upon destroying all of his ten bases on the
Archipelago
.
Painting of Hammerman wearing his War Time Epaulettes